Anatomy of a handgun
Are you familiar with all of the parts of a handgun? Have you watched videos of influencers talking about different parts of a gun and you had no idea what they were talking about? Well… This page is for you! The information below will help you take your handgun knowledge to the next level by helping you understand what all of the parts of a handgun are.
Generally, there are two types of handguns:
Pistol
Pistol
A pistol is generally defined as a semi-automatic firearm that can be fired with one hand, has a single chamber, and loads bullets with a removable magazine (most common) or a clip (very rare). Pistols are the most common type of handgun used today. Due to the way it functions, a pistol is often called a “semi-automatic”.
Revolver
Revolver
A revolver is generally defined as a handgun that uses a rotating cylinder to hold multiple rounds of ammunition and can be fired with one hand. Even though revolvers are incredibly reliable, pistols are much more common today due to their higher capacity and ease-of-use.
Let’s take a look at the anatomy for each.
Pistol
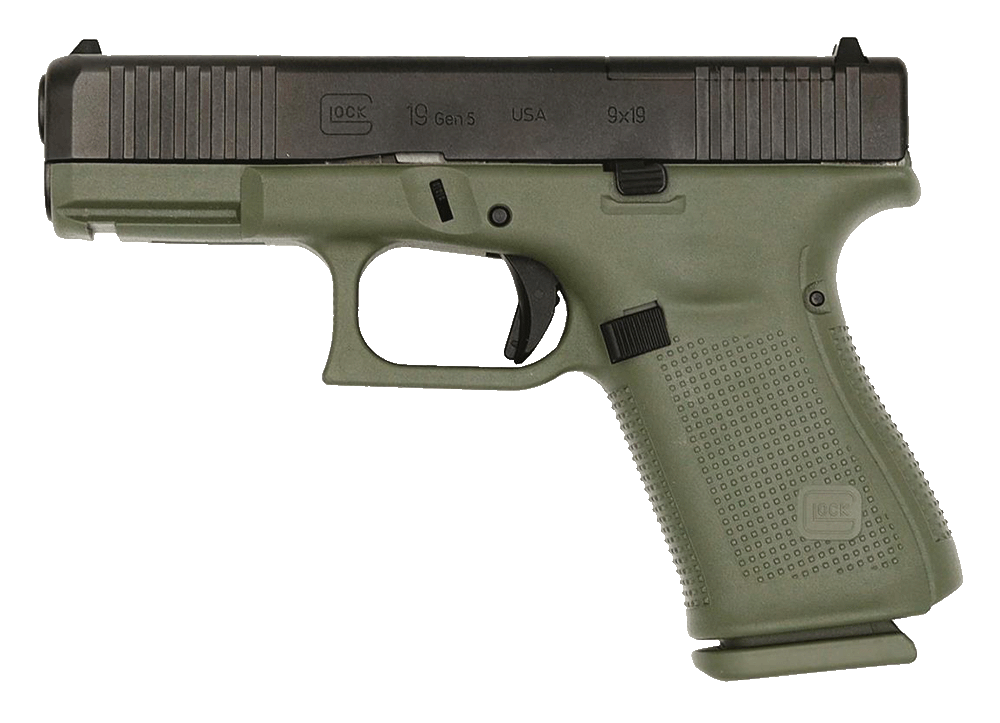
Let’s start by looking at the various parts of a pistol using a Glock 19 Gen 5 as an example. These definitions will be generally true for the majority of pistols available today, but are not 100% true of all pistols.
Rear sights
Rear sights are used when aiming your firearm (assuming you don’t have an optic/red dot).
[Click here to learn more]
Front sight
Front sights are used when aiming your firearm (assuming you don’t have an optic/red dot).
[Click here to learn more]
Front slide serrations
These are indentations, grooves, channels or textures milled into the slide that allow you to more easily grip it.
[Click here to learn more]
Rear slide serrations
These are indentations, grooves, channels or textures milled into the slide that allow you to more easily grip it.
[Click here to learn more]
Optic plate / Optic mount
A plate that covers the area where an optic / red dot could be mounted.
[Click here to learn more]
Take down lever
This lever typically needs to be moved when you are trying to take your pistol apart (aka “field strip”).
[Click here to learn more]
Slide release / Slide lock
This control allows you to lock your slide into the back position. Or, if it’s already locked in the back position, and you want to move it forward, you can press this to release the slide.
[Click here to learn more]
Rail / Picatinny rail
This area on the pistol is used for adding attachments, such as a light or laser.
[Click here to learn more]
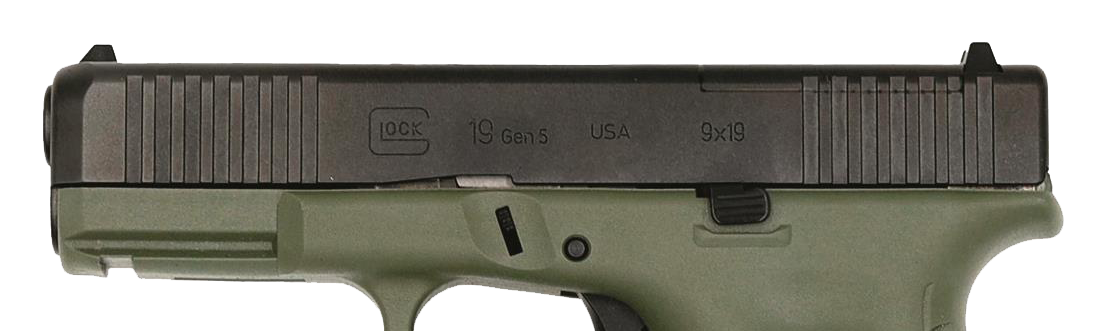
Slide
The slide is essentially the entire top part of the pistol. Inside it you will find your barrel and recoil spring. During operation, firing a round (pulling the trigger) will cause the slide to move backward, ejecting the empty casing from the bullet you just shot, and then move forward to push the next round into the chamber.
The slide is also what your sights are attached to and where you would mount an optic / red dot if you choose to have one.
Front slide serrations
These are indentations, grooves, channels or textures milled into the slide that allow you to more easily grip the slide when “racking” the slide or doing a “press check” (moving the slide back slightly to see if a bullet is in the chamber).
Generally speaking, the rear slide serrations are used more often than the front serrations. However, as optics (red dots) have become more popular, some people are opting to use the front serrations more often to avoid putting pressure on the optic. In the opinion of The Practical Pistol, this level of concern isn’t necessary. If properly mounted, it’s fine to rack a slide using an optic.
Rear slide serrations
These are indentations, grooves, channels or textures milled into the slide that allow you to more easily grip the slide when “racking” the slide or doing a “press check” (moving the slide back slightly to see if a bullet is in the chamber).
Generally speaking, the rear slide serrations are used more often than the front serrations. However, as optics (red dots) have become more popular, some people are opting to use the front serrations more often to avoid putting pressure on the optic. In the opinion of The Practical Pistol, this level of concern isn’t necessary. If properly mounted, it’s fine to rack a slide using an optic.
Take down lever
This lever typically needs to be moved when you are trying to take your pistol apart (aka “field strip”).
In most cases, the process to field strip your pistol involves more than just moving this lever. For example, you may need to slightly pull the slide back while moving the lever. Check your user’s manual or watch a YouTube video to learn how your specific pistol needs to be manipulated to field strip it.
Muzzle
This is where the bullet comes out when you pull the trigger. If the barrel extends past the front of the slide, it probably has a threaded barrel which allows the attachment of a silencer or compensator.
Front sight
Front sights are used when aiming your firearm (assuming you don’t have an optic/red dot).
Front sights usually fall into one of a couple of categories:
- White dot (just a painted white dot)
- Tritium (colorful insert that glows in the dark)
- Fiber optic (colorful insert that is bright in sunlight)
If a handgun will be used for home defense, and you aren’t using an optic, it’s recommended you have a tritium front site to make it easier to see in the dark.
Front sights also come in different heights:
- Co-witness or suppressor height (taller sights that you can still see when you are using an optic or a silencer)
- Standard height (these are generally blocked when using an optic or silencer)
If you have no intention of using an optic, then standard height sights are fine. And if you change your mind in the future, many (not all) guns will allow you to change out the sights to taller ones.
If you DO plan to use an optic, it’s recommended (though not mandatory) that you have taller sights to ensure you still have a way to aim if your optic ever fails you (such as the battery dying).
Rear sights
Rear sights are used when aiming your firearm (assuming you don’t have an optic/red dot).
Rear sights usually fall into one of a couple of categories:
- White dot (two white dots)
- White curve or tray (a white line that goes from one side of the sight to the other)
- Blacked out (no dots or color of any kind)
The rear sights you choose are really just a matter of personal preference and what your eye can “pick up” the fastest.
Rear sights also come in different heights:
- Co-witness or suppressor height (taller sights that you can still see when you are using an optic or a silencer)
- Standard height (these are generally blocked when using an optic or silencer)
If you have no intention of using an optic, then standard height sights are fine. And if you change your mind in the future, many (not all) guns will allow you to change out the sights to taller ones.
If you DO plan to use an optic, it’s recommended (though not mandatory) that you have taller sights to ensure you still have a way to aim if your optic ever fails you (such as the battery dying).
Optic plate / Optic mount
Optic plate
A plate that covers the area where an optic / red dot could be mounted.
Many pistols that are available on the market come as “optic-ready”. This means that it is already set up to have an optic / red dot mounted to it. Until you decide to add an optic, the pistol comes with a plate that covers the mounting area.
Optic mount
When it’s time to add an optic / red dot to your pistol, you first need to remove the optic plate that came with the pistol when you bought it. Once removed, you will see the area where your new optic will be mounted. But be warned: Not all optics will go on all pistols. There are many different optic “footprints” that determine how the optic attaches to the pistol. You will need to make sure that the optic you purchase has a footprint that is compatible with your pistol. Common footprints are Trijicon RMR, Shield RMSc, and Glock MOS. If your optic isn’t directly compatible with your pistol, it may be possible to buy an adaptor plate that will allow the optic to be mounted to your pistol.
Many pistols that are available on the market come as “optic-ready”. This means that it is already set up to have an optic / red dot mounted to it. Until you decide to add an optic, the pistol comes with a plate that covers the mounting area.
Slide release / Slide lock
This control allows you to lock your slide into the back position. This is done by pressing upward on the slide release control while holding the slide in the back position.
Also, many pistols are designed to automatically lock themselves into the back position after you’ve fired the last round out of a magazine (giving you a visual indication that your pistol is out of ammo). Not all pistols have this automatic feature, and some that do have the feature won’t always lock themselves back consistently (there are a number of possible reasons for this).
If the slide is already locked in the back position, and you want to move it forward, you can press this control downward to release the slide back to the forward position. Please note that if you are releasing the slide because you just put a full magazine into your pistol, the movement of the slide into the forward position will load a new round/bullet into your chamber and your gun will be fully armed and ready to fire.
Rail / Picatinny rail
This area on the pistol is used for adding attachments, such as a light or laser.
Not all pistols have a rail, so if you are interested in adding an attachment, you should make sure you purchase a pistol with a rail.
Rails can have multiple “slots” on them which allows some attachments to be placed in a different positions along the rail. In the example image, there is only a single slot which is located in the most common position and will accommodate most popular attachments. See the “Pistol – Continued” section on this page to see a rail with multiple slots.
When people discuss a “rail”, they will often use the term “picatinny rail”. These terms are essentially interchangeable as a “picatinny” rail is simply the most common rail used today. The “weaver” rail is the only other real rail type and it’s generally not used anymore.
Trigger guard
The trigger guard helps protect the trigger form accidentally being pressed.
[Click here to learn more]
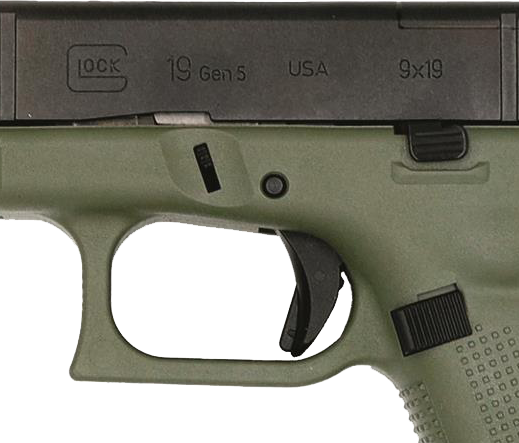
Trigger safety
This “blade” protrudes from the center of the trigger and must be depressed before the trigger can be pulled back.
[Click here to learn more]
Magazine release
Press this button to remove a magazine from your pistol.
[Click here to learn more]
Trigger guard
The trigger guard helps protect the trigger form accidentally being pressed.
The overall shape and size of the guard isn’t really important. The only real consideration here is if you practice at an outdoor range, and live in a colder environment, you may want to consider whether or not the trigger guard is large enough to accommodate gloves.
Trigger
When the trigger is pressed, the gun fires.
Triggers can be completely flat all the way to very curved. The shape of the trigger doesn’t necessarily make much of an impact to the average shooter. However, skilled shooters (competitors, law enforcement, military) tend to prefer triggers that are more flat than curved (see the “Pistol – Continued” section on this page to see an example of a competition flat trigger.). The reasons to choose one trigger shape over another aren’t discussed here because they are generally not important to new gun owners.
Generally speaking, the process of pulling a trigger has several stages:
- The “takeup” – This is the initial part of the movement that does NOT fire the pistol. You’re essentially taking the slack out of the trigger. Some consider this a safety feature in the firearm as it allows the trigger to move a bit without actually discharging the weapon. The takeup continues until you hit the “wall”.
- The “wall” – This stage is identified by a slight increase in the resistance to pull the trigger. In other words, to continue past the wall you need to pull the trigger a bit harder than you did during the “takeup”.
- The “creep” – This is the amount the trigger travels after you’ve hit the wall but before you hit the “break”. Minimal creep is generally expected out of a good quality trigger. Triggers with a lot of creep are generally considered poor triggers.
- The “break” – This stage is when the pistol actually fires a round.
- The “reset” – After the pistol has been fired, and the trigger is pulled all the way back, you’ll need to move the trigger forward to fire another round. However, you don’t need to move the trigger all the way forward. Generally, you can move the trigger back to the “wall” where you will hear a click that indicates the trigger has been reset and is ready to be fired again. The click that happens may be more or less pronounced depending on the firearm. In general, a trigger that resets in a very short distance is considered a good trigger.
A final word about “good” vs. “bad” triggers. Unless you’re a skilled shooter (competitor, law enforcement, military), the quality of the trigger will have minimal impact on your shooting. Yes, a good trigger will help you a bit with accuracy and the speed of follow-up shots, but new gun owners should focus more on the fundamentals of shooting a firearm than on the quality of the trigger. A “bad” trigger in the hands of a practiced shooter is much better than a “good” trigger in the hands of someone that never practices.
Trigger safety
![]()
This “blade” protrudes from the center of the trigger and must be depressed before the trigger can be pulled back. Since it is located on the trigger, it naturally gets depressed when you attempt to fire the pistol intentionally, so it’s a safety that you don’t even have to think about. And, since the trigger can’t be pulled back unless the safety is depressed, it helps to avoid accidentally firing the weapon (for example, if the trigger got snagged on a piece of clothing while attempting to put the pistol into a holster).
Trigger safeties do not exist on all firearms, but The Practical Pistol recommends them, especially if the gun does not have a thumb safety. One of the arguments against thumb safeties is that you have to train to turn the safety off before you can fire the pistol. In a high stress situation, you may forget to do this, especially if you don’t train a lot (and maybe even if you do train a lot). And, if you are in imminent danger, that mistake could be a big deal. With a trigger safety, you don’t have to think about any extra steps as the safety is naturally turned off as your finger pulls the trigger.
Magazine release
Press this button to remove a magazine from your pistol.
Generally this is done when you’ve fired the last round/bullet from a magazine and need to remove the magazine from the pistol so you can insert a new loaded magazine.
In this example you are seeing the type of magazine release that is common on most pistols. However, there are also pistols that have a “paddle” release which is located on the bottom rear part of the trigger guard.
Grip
The grip is where you hold the pistol when firing it. It typically involves some level of texture to assist with your ability to grip the pistol.
[Click here to learn more]
Beavertail
The beavertail is the curved area at the top of the grip, right under the back of the slide.
[Click here to learn more]
Magazine
The magazine holds the bullets for your pistol and is inserted into the grip.
[Click here to learn more]
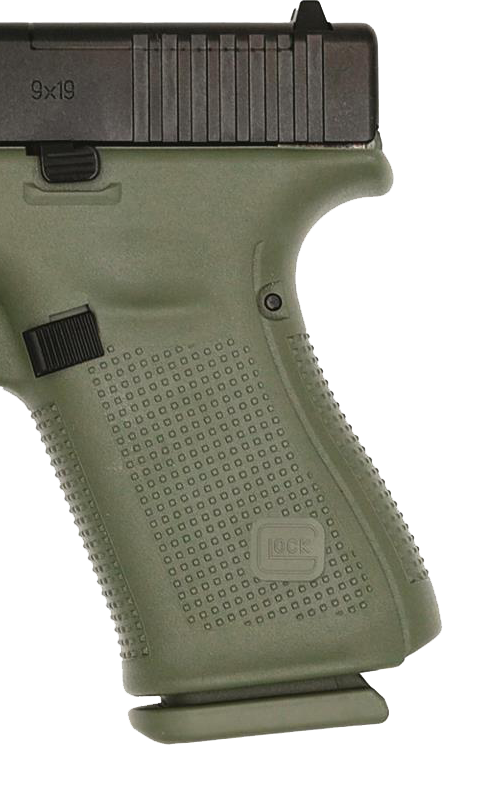
Grip
The grip is where you hold the pistol when firing it. It typically involves some level of texture to assist with your ability to grip the pistol.
The grip is one of the primary considerations when choosing a firearm. The grip should fit comfortably in your hand. A grip that is too large or too small for your hand will impact your ability to shoot accurately and comfortably, and history has shown that if shooting a gun is uncomfortable, you just won’t shoot it (meaning you won’t practice).
When considering purchasing a firearm, you should really go to a range where they offer rentals so that you can try guns with a variety of different sized grips to get a feel for what your preference is.
Another consideration is the grip texture and placement. The more “aggressive” the texture, the more it will aid your grip, but it may cause some discomfort in your hand. Also, if you plan to conceal carry your pistol, an aggressive texture can cause discomfort on any skin that the grip may rub against. Ultimately you should choose a texture that is as aggressive as possible without causing discomfort. As for grip placement, many people prefer texture that covers as much of the grip as possible, including the front and back, and extending all the way to the slide. This should not be a huge consideration for new shooters.
One final thing about grips: In this example we are showing a Glock, which has a more severe grip angle than most pistols. It’s about 22 degrees where most pistols have a grip angle between 18 and 20. Some people love this about Glocks, and some people hate it. The Practical Pistol recommends you try a variety of grip angles to see which feels better to you.
Beavertail
The beavertail is the curved area at the top of the grip, right under the back of the slide. It allows you to get your hand as high as possible on the grip (a good thing!) without interferring with the movement of the slide when the pistol is fired. As with the other parts of the grip, this should feel comfortable in your hand.
Backstrap
The backstrap is the back part of the grip. Many pistols today will come with replaceable backstraps, allowing you to modify the overall size of the grip to make it better fit your hand.
Magazine
The magazine holds the bullets for your pistol and is inserted into the grip.
Depending on the size of your pistol, a magazine will hold anywhere from 5 to 21+ rounds (this may be limited based on the laws in your state).
They can be single-stack (thinner, but hold fewer rounds) or double-stack (thicker, but hold more rounds), depending on the pistol. Double-stack magazines are far more common in current pistols than single-stack, but if you have unusually small hands, you may wish to consider a pistol that uses single-stack magazines.
Magazines may be flush fit (barely noticeable at the bottom of the grip) or extended (extending a little or a lot from the bottom of the grip). In this example we see a slightly extended magazine.
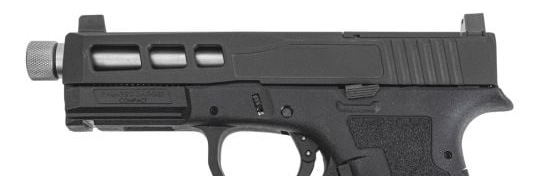
Pistol – Continued
Now let’s look at a couple of different pistols to cover a few more areas you should be aware of.
Compensator
A compensator is located at the end of the barrel/muzzle and is designed to help with recoil.
[Click here to learn more]
Optic / Red dot
An optic is an accessory that allows you to aim your pistol using a projected dot and/or circle on a small window.
[Click here to learn more]
Hammer
Some pistols have a hammer (either internal or external) that is used to strike the bullet, causing the gun to fire.
[Click here to learn more]
Magwell (sorta)
Technically, a magwell (short for magazine well) refers to the cavity in the grip of a pistol where your magazine is inserted. HOWEVER, when people say “magwell” they are usually referring to the flared part located at the bottom of the grip.
[Click here to learn more]
Thumb safety
A thumb safety is a manual safety that stops the gun from firing when it is engaged. In order to fire the gun, the thumb safety must first be “defeated” (turned off or disengaged).
[Click here to learn more]
Compensator
A compensator is located at the end of the barrel/muzzle and is designed to help with recoil.
When a bullet is fired, it expels gasses. With a compensator, the gases are forced upward, essentially pushing the barrel down. This helps to counteract the upward movement of the barrel (recoil) that occurs when the pistol is fired. Experienced shooters are more likely to feel this difference than new shooters.
Compensators can be built-in or attached separately (typically on a threaded barrel).
While compensators do help with recoil, their impact is not necessarily a huge one (especially to new shooters). Plus, compensators can make cleaning your pistol more difficult, they typically require you to clean your gun more often, and they may require you to shoot more expensive ammunition (inexpensive ammo will sometimes cause malfunctions due to the slide not cycling properly). For these reasons, the decision to buy a gun with a compensator should be carefully considered.
While The Practical Pistol doesn’t directly discourage compensators for new shooters, we find the cost, added complexity, and minimal impact to be negatives. If you feel strongly that you are going to take up shooting as a hobby, and you want to start with a quality gun, then feel free to get a compensator. Otherwise, it’s really not necessary.
Optic / Red dot
An optic is an accessory that allows you to aim your pistol using a projected dot and/or circle on a small window. It is mounted to the rear of your slide and is powered by a replaceable batter or a solar-powered battery.
Depending on the heights of your iron sights (see “front site” and “rear sights” above), the optic will either take the place of your iron sights (if the optic blocks them), or you can “co-witness”. “Co-witness” is when your iron sights are tall enough to be seen through the optic window so you can use either the projected dot/circle or the iron sights. This is especially useful in the event that the battery in your optic dies or the optic malfunctions as you will still be able to aim using the iron sights.
Optics typically come with either a red or a green dot/circle. Either is fine, though some eye conditions benefit from one color over another. Because optics were first introduced with a red dot, the term “red dot” is often used as a replacement for “optic”, even if the actual dot is green.
Optics are becoming VERY popular and The Practical Pistol highly recommends them. Also, we recommend co-witness height iron sights to ensure you have a way to aim your pistol, even if your optic fails.
Even if you don’t plan to use an optic, The Practical Pistol HIGHLY recommends that you purchase an optic-ready pistol so that you still have the option to add an optic later if you change your mind.
Hammer
Some pistols have a hammer (either internal or external) that is used to strike the bullet, causing the gun to fire.
Pistols generally come in one of two forms: Striker-fired or hammer-fired. The pistol shown above (Glock) is striker-fired. That is not mentioned in the diagram of parts for the Glock because the striker is not visible unless you take the pistol apart.
There are a huge variety of opinions about which form is better, but The Practical Pistol recommends striker-fired pistols to new shooters as there is less complexity involved. Due to this, we won’t cover any additional information about hammers on this page.
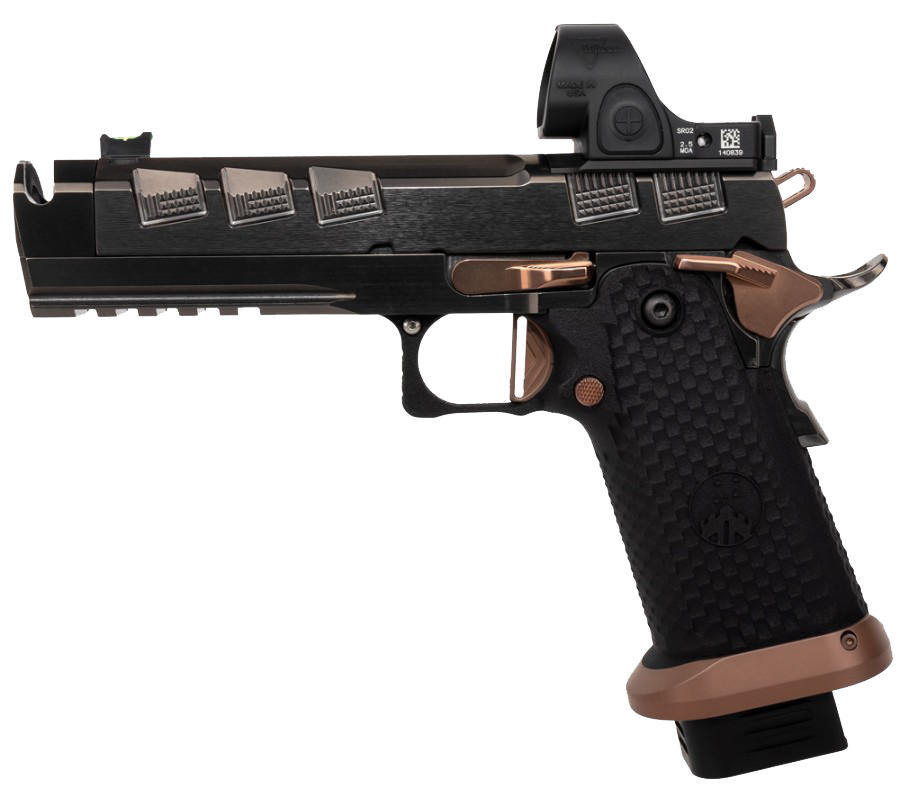
Magwell
Technically, a “magwell” (short for magazine well) refers to the cavity in the grip of a pistol where your magazine is inserted. HOWEVER, when people say “magwell” they are usually referring to the flared part located at the bottom of the grip (shown in bronze in this example image). That’s what we will be discussing when we say “magwell”.
A magwell is designed to assist you in getting your magazine properly inserted into your pistol. The flared aspect of a magwell provides a “ramp” of sorts to guide the magazine, allowing you to insert your magazine faster and more accurately.
While magwells look cool and can actually make a grip more comfortable, they really only provide a benefit to skilled shooters (competitors, law enforcement, military) that need to reload their pistol quickly. Don’t get us wrong… A magwell provides some level of benefit to anyone that finds themselves in a situation where they need to reload their pistol, but the benefit is minimal for new shooters. Plus, magwells typically only come on more expensive pistols or have to be purchased separately, so it’s hard for us to recommend it to new shooters based on the minimal benefit.
Thumb safety
A thumb safety is a manual safety that stops the gun from firing when it is engaged. In order to fire the gun, the thumb safety must first be “defeated” (turned off or disengaged).
Feelings about thumb safeties are mixed. Many people don’t like thumb safeties because they feel that the need to “defeat” the safety can be forgotten in a dangerous, high-stress situation, making the gun unusable. And if split seconds are important, you likely won’t have time to comprehend why the gun isn’t firing before it is too late. With that said, regular training (engaging and disengaging the safety each time you start/finish firing) can build the muscle memory necessary to “defeat” the safety without even thinking about it.
Here is our take: A thumb safety is discouraged for a home defense weapon. People that have a gun solely for home defense are less likely to train regularly, and therefore are more prone to not “defeat” the safety when a threat is present. HOWEVER, we personally like thumb safeties for guns that will be used for concealed carry. If you conceal carry you absolutely SHOULD be training regularly and will be able to build the needed muscle memory to automatically “defeat” the safety when a threat is present. Plus you get the added benefit of an extra safety when the concealed weapon is holstered with its muzzle is pointed at important parts of your body.

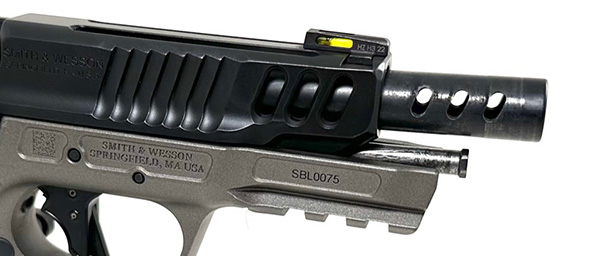
Gas pedal
A “gas pedal” is a ridge or protrusion that is attached to the frame of a handgun that allows the shooter to rest the thumb of their support hand on it, helping to reduce muzzle rise caused by recoil.
[Click here to learn more]
Gas pedal
A “gas pedal” is a ridge or protrusion that is attached to the frame of a handgun that allows the shooter to rest the thumb of their support hand on it. While shooting, pressure can be applied to the gas pedal, helping to reduce muzzle rise created from recoil when you fire the weapon.
Most pistols do not come with a true gas pedal. If anything, they may have a small area that is textured and only protrudes slightly, such as on the Ruger RXM as shown here:
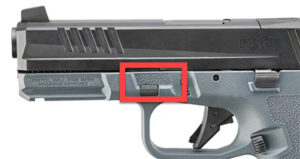
This built-in gas pedal may also be referred to as an “index point”.
True gas pedals are typically only added by competitive shooters.
NOTE: Gas pedals will often (but not always) interfere with how a pistol fits in a holster. If you choose to add one to your gun, and you are using a holster, you may need to alter the holster or order a custom holster to allow for the gas pedal.
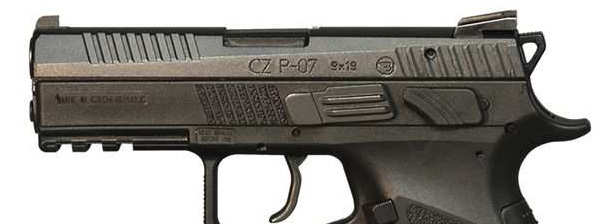
Decocker
On hammer-fired pistols, where the hammer is in the back position, the decocker allows you to safely lower the hammer without the gun firing.
[Click here to learn more]
Decocker
On some hammer-fired pistols, when the hammer is in the back position, a decocker allows you to safely lower the hammer without the gun firing.
A decocker does look similar to a thumb safety, but it is completely different. Depending on the specific pistol, a hammer-fired handgun may come with a thumb safety, decocker, both, or neither.
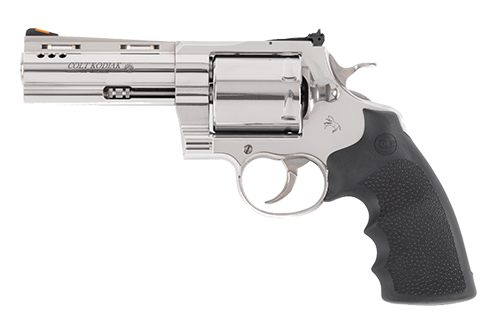
Pistols generally come in one of two forms: Striker-fired or hammer-fired. The pistol shown here is hammer-fired, while the pistol at the top of the page (Glock) is striker-fired. The “striker” is not detailed in the diagram for the Glock because the striker is not visible unless you take the pistol apart.
There are a huge variety of opinions about which form is better, but The Progressive Protector recommends striker-fired pistols to new shooters as there is less complexity involved. However, if you prefer a hammer-fired pistol, The Progressive Protector thinks a decocker is an excellent option because lowering a hammer without a decocker is one of the most common ways of having a negligent discharge (the gun firing when you don’t want it to).
Threaded barrel
A threaded barrel allows accessories to be attached to the front of the pistol.
[Click here to learn more]
Lightening cuts
Lightening cuts are holes cut in a pistol’s slide that make the slide lighter and faster, resulting in less felt recoil.
[Click here to learn more]
Threaded barrel
A threaded barrel allows accessories to be attached to the front of the pistol. In general, there are only two possible attachments:
- Silencer/suppressor
- Compensator
Silencer/suppressor
The advantage of being able to add a silencer/suppressor to your handgun is that you can shoot your handgun at a range without ear protection and without harming your ears. However, standard ear protection works just as well so the cost and hassle of buying a silencer/suppressor isn’t really worth it. There are no other practical reasons for adding a silencer/suppressor to your handgun.
Compensator
A compensator directs gases out of your pistol when you fire it to help reduce recoil. Compensators can be integrated or can be an added on with a threaded barrel. As a new shooter, a compensator will not have a huge impact on your shooting (learning and mastering fundamentals will take you a lot further). While integrated compensators are fine, add-on compensators are generally frowned upon for home defense and/or concealed carry as they increase the possibility of a malfunction.
————
With the above information in mind, The Progressive Protector believes a threaded barrel should NOT be a major consideration when purchasing your first handgun.
Lightening cuts
Lightening cuts are holes cut in a pistol’s slide that make the slide lighter and faster, resulting in less “felt recoil” (the gun will feel like it is recoiling less when it is fired).
Note that these are called “lightening” cuts (as in making something lighter), not “lightning” cuts.
Lightening cuts should not be confused with “ports”. Though they can look quite similar, ports direct gases out of the barrel when you fire the gun, helping to lessen recoil, while lightening cuts are simply a way to reduce weight.
Very few stock pistols come with lightening cuts, but virtually any pistol can have them added by a skilled gunsmith.
Due to the minimal impact these will have on your shooting, they should NOT be much of a consideration when purchasing your first handgun.
Ports/porting
A ported barrel is a barrel with holes cut in it that allows gases to be directed to reduce recoil.
[Click here to learn more]
Ports/porting
A ported barrel is a barrel with holes cut in it (typically with corresponding holes in the pistol’s slide) that allows gases to be directed to reduce recoil.
Ports/porting should not be confused with “lightening cuts”. Though they can look quite similar, ports direct gases out of the barrel when you fire the gun, helping to lessen recoil, while lightening cuts are simply a way to reduce the weight of your slide (which can also help with recoil).
Very few stock pistols come with ports/porting, but virtually any pistol can have them added by a skilled gunsmith.
Due to the minimal impact these will have on your shooting, they should NOT be much of a consideration when purchasing your first handgun.
Revolver
Let’s take a look at the various parts of a revolver using a Colt Kodiak as an example. These definitions will be generally true for the majority of revolvers available today, but are not 100% true of all revolvers.
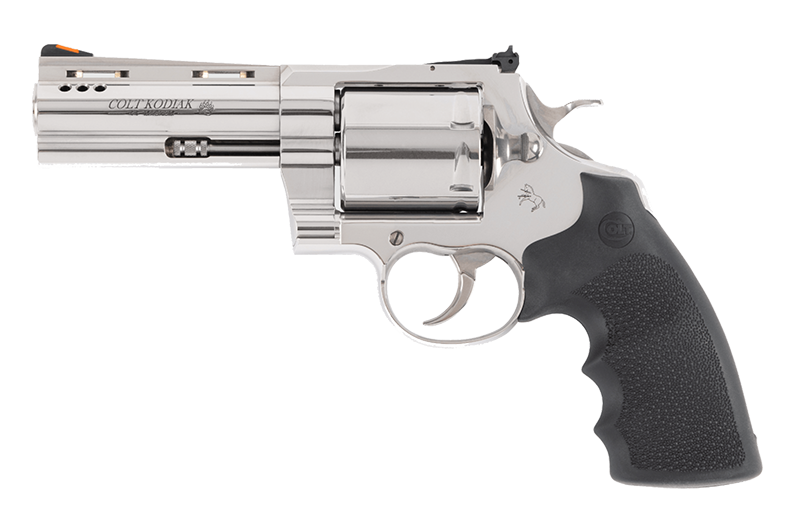
Muzzle
This is where the bullet comes out when you pull the trigger.
Hammer
All revolvers have a hammer (either internal or external) that is used to strike the bullet, causing the gun to fire.
[Click here to learn more]
Cylinder
A cylinder is a rotating drum-shaped component that holds the rounds/bullets for your revolver.
[Click here to learn more]
Cylinder release
The cylinder release is a small lever that, when moved, will allow the cylinder to swing out away from the frame, allowing it to be loaded/unloaded.
[Click here to learn more]
Extractor rod
When the cylinder has been released and is away from the frame, the extractor rod can be pressed to empty the entire cylinder all at once.
[Click here to learn more]
Trigger guard
The trigger guard helps protect the trigger form accidentally being pressed.
[Click here to learn more]
Grip
The grip is where you hold the revolver when firing it. It typically involves some level of texture to assist with your ability to grip the revolver.
[Click here to learn more]
Hammer
All revolvers have a hammer (either internal or external) that is used to strike the bullet, causing the gun to fire.
Depending on the revolver, the hammer (external) can be in one of two positions:
- Fully forward (resting) – The hammer is in the forward position, resting against the frame, and NOT ready to fire.
- Fully back (cocked) – The hammer is in the back position and is ready to fire.
Many modern revolvers also have a “decocker” which allows you to safely release the hammer from the fully back position without firing the gun.
Cylinder
A cylinder is a rotating drum-shaped component that holds the rounds/bullets for your revolver.
Each time the revolver is fired, the cylinder will turn, moving the next round/bullet into the firing position. The cylinder will also rotate if the hammer is manually moved to the fully back (cocked) position.
A typical cylinder will hold between 5 and 8 rounds/bullets.
Cylinder release
The cylinder release is a small lever that, when pressed, will allow the cylinder to swing out away from the frame, allowing it to be loaded/unloaded.
Though uncommon, not all revolvers have cylinder releases. Some older revolvers have a small door that opens, allowing you to load or unload rounds one at a time.
Trigger guard
The trigger guard helps protect the trigger form accidentally being pressed.
The overall shape and size of the guard isn’t really important. The only real consideration here is if you practice at an outdoor range, and live in a colder environment, you may want to consider whether or not the trigger guard is large enough to accommodate gloves.
Trigger
When the trigger is pressed, the gun fires.
The movement of the trigger will depend on the type of revolver you have:
- Single-action – With this type of revolver you need to manually pull the hammer back before each shot. The trigger pull will be light and short on each shot.
- Double-action – Pulling the trigger both cocks the hammer and releases the hammer. This results in a longer trigger pull that is much havier compared to single-action.
- Double-action/Single-action – With this type of revolver the first shot is a double-action trigger pull (long, heavy pull), but the gun will automatically be cocked for the next shot, resulting in a single-action trigger pull (short and light).
The most common type of revolver today is the double-action, single-action. The negative part of this type of revolver for new shooters is that you have to train to get used to two different types of trigger pulls, depending on whether it’s your first shot or a follow-up shot.
Front sight
Front sights are used when aiming your firearm.
Front sights usually fall into one of a couple of categories:
- White dot (just a painted white dot)
- Tritium (colorful insert that glows in the dark)
- Fiber optic (colorful insert that is bright in sunlight)
If a handgun will be used for home defense, it’s recommended you have a tritium front site to make it easier to see in the dark.
Rear sights
Rear sights are used when aiming your firearm.
Rear sights usually fall into one of a couple of categories:
- White dot (two white dots)
- White curve or tray (a white line that goes from one side of the sight to the other)
- Blacked out (no dots or color of any kind)
The rear sights you choose are really just a matter of personal preference and what your eye can “pick up” the fastest.
Though rare, some revolvers do not have rear sights as they are intended for very close shooting that doesn’t require traditional “aiming”.
Extractor rod
When the cylinder has been released and is away from the frame, the extractor rod can be pressed to empty the entire cylinder all at once. This helps to unload the cylinder quickly prior to reloading it.
Pressing the extractor rod will remove both empty shell casings as well as unfired rounds.
Grip
The grip is where you hold the revolver when firing it. It typically involves some level of texture to assist with your ability to grip the revolver.
The grip is one of the primary considerations when choosing a firearm. The grip should fit comfortably in your hand. A grip that is too large or too small for your hand will impact your ability to shoot accurately and comfortably, and history has shown that if shooting a gun is uncomfortable, you just won’t shoot it (meaning you won’t practice).
When considering purchasing a firearm, you should really go to a range where they offer rentals so that you can try guns with a variety of different sized grips to get a feel for what your preference is.
Another consideration is the grip texture and placement. The more “aggressive” the texture, the more it will aid your grip, but it may cause some discomfort in your hand. Also, if you plan to conceal carry your revolver, an aggressive texture can cause discomfort on any skin that the grip may rub against. Ultimately you should choose a texture that is as aggressive as possible without causing discomfort.
Unlike pistols, revolvers don’t generally have backstraps or the ability to add them, so the size of the grip that comes with the revolver cannot be altered to accomodate different hand sizes. However, you can typically buy different grips for common revolver models to get a fit that is better for you.